How To Use Joist Hangers
Understanding Joist Hangers
Joist hangers are essential components in modern decking and framing projects. They provide strong, reliable support where joists meet beams or walls.
These metal brackets carry the weight of load-bearing joists, transferring structural stresses into the beam or ledger they connect to. Available in different sizes and profiles, joist hangers are chosen based on the dimensions of the joist they will support. Their use reduces the chance of joist rotation and helps maintain a level structure over time, which is especially important for safety and long-term durability.
Selecting the Right Joist Hanger
Choosing the correct joist hanger is critical for the integrity of your construction project. A poor fit can compromise the safety and performance of the joist system.
Joist hangers come in a variety of configurations designed to fit standard joist sizes such as 2x6, 2x8, or 2x10. When selecting one, you’ll also need to factor in the materials being used; for example, hangers for treated lumber often require corrosion-resistant coatings or stainless steel to withstand moisture and chemical exposure. Additionally, local building codes may specify certain types or grades of hardware that must be used in residential or commercial applications.
Other variables to consider include load requirements, environmental exposure, and whether you’re applying the hanger in a concealed or exposed setting. Manufacturers typically provide load ratings to help you match your hanger to the specific structural demands of your project. Always verify these details before finalizing your hardware purchases.
Preparing for Installation
Proper preparation will ensure your joist hangers are installed securely and function as intended. This includes planning and gathering the right tools and materials.
Before installation, make sure all joists and beams are cut to the correct dimensions and free from warping or defects. Use a level to double-check that all framing elements are aligned. This setup guarantees that the joists will sit flush within the hangers, which is critical to their structural performance. You’ll also need the proper fasteners—typically approved nails or screws specifically designed for use with joist hangers. Substituting incorrect fasteners can weaken the connection and violate building codes.
Clear the work area of debris and confirm whether you’ll be attaching hangers to wood or concrete, as this will influence the anchoring method. For wood, common nails or structural screws are typical, while concrete attachments might require masonry anchors. Pre-drilling may also be necessary in certain cases to avoid splitting the wood, especially with dense or pressure-treated lumber.
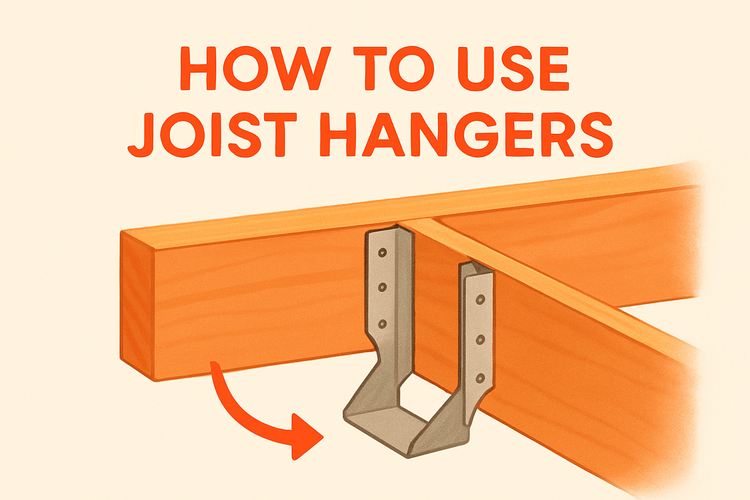
Installing Joist Hangers
Attaching joist hangers properly is a straightforward process but requires accuracy and attention to detail. A rushed or uneven install can lead to structural issues later.
Begin by positioning the joist hanger at the desired height on the ledger board or beam. It’s helpful to use a joist as a guide to ensure a snug fit. Once aligned, use hanger nails or structural fasteners to secure each side of the hanger to the beam, filling all nail holes as indicated. Skipping holes can reduce the hanger’s load-bearing capacity.
After the hanger is fixed in place, insert the joist and tap it down gently until it sits fully within the hanger seat. Fasten the joist to the hanger using nails or screws installed through the side flanges and into the joist. Some advanced hangers also include a bottom flange or “seat” that adds additional support and stability.
Double-check your alignment and fastener placement before moving on to the next hanger. Continue this pattern across the span of your project, pausing periodically to confirm level and spacing consistency. This careful process ensures a secure foundation and smooth installation overall.
Common Mistakes and How to Avoid Them
Even a simple oversight during installation can compromise a joist hanger’s performance. Awareness of potential pitfalls can help avoid costly corrections later.
One of the most frequent mistakes is using the wrong type or size of fastener. Joist hangers are engineered to meet load requirements only when used with their specified hardware. Improvised or under-sized screws, nails, or alternate brands may not meet the necessary structural specs. Always refer to the hanger manufacturer's documentation for exact guidelines.
Improper placement is another key issue. If hangers are installed out of level or skewed, the joists won’t seat correctly, reducing load distribution efficiency and potentially leading to long-term sagging. Using a level and measuring tape during placement helps prevent these problems. Similarly, failing to nail through every required hole in the hanger reduces its rated capacity and can result in premature failure.
Lastly, be sure to inspect joist hangers for signs of rust, concealment damage, or manufacturing defects before installation. Especially in high-moisture or coastal areas, galvanized or stainless-steel versions are necessary to resist corrosion over time. Taking these preventive steps allows for a more durable, long-lasting structure that meets building code and safety standards.